NOTE: This lesson was created for openFrameworks 0071 and below. Some parts of it might be outdated with the release of 0072.
This chapter will introduce methods of animation and making things move. Simple animation techniques.
Using Variables
Drawing static shapes is great, but what if we want our shapes to move around the screen?
We mentioned earlier that the draw() function is called repeatedly after the program is started. This is very important because it is how we achieve animation in openFrameworks. It might be a little unintuitive if you are used to Flash or even something like stop-frame animation, where you can add something to a “stage” and then reposition it as needed. This is not how openFrameworks (or most computer animation) works. Actually, openFrameworks is more like traditional (we’re talking old-school Disney/Bambi) animation, where we must redraw the frame completely every single “frame”. In the parlance of openFrameworks, every time the draw() function is called is one “frame”. So, in actuality, when you run the program above and see your purple circle, what you are actually looking at is the circle being drawn, then cleared (a single frame), and then drawn, then cleared, repeatedly. It’s just happening so fast that it appears to stay where it is.
In the example above, when we draw our circle, we use two numbers to tell the ofCircle function where to draw the circle within the window. So it follows that, if we want the circle to appear to move, we need to change these numbers over time. Perhaps the first time draw() happens, the circle is drawn at (200, 300), but in the next time, we want it to be one pixel to the right (201, 300), and then another pixel to the right (202, 300), and so on.
In c++, and in programming in general, whenever you have a value that you want to change, you create a “variable”. Variables come in different shapes and sizes depending on what they represent, such as decimal numbers, whole numbers, a letter, or a bunch of letters. In this case, we want to create variables that can stand in for coordinates in our ofCircle function, so we will use 2 ints.
Put this at the top of your testApp.cpp, right under the #include line, so that your file starts like this:
#include"testApp.h"intmyCircleX;intmyCircleY;
In those 2 new lines of code, we “declared” 2 new variables: one called ‘myCircleX’ and one called ‘myCircleY’. You could actually name them whatever you want (within reason), but it’s a good idea to name them something that is related to how they will be used. We also said that these variables will be used to hold whole-number integer values, or ints. Declaring a variable is an important and necessary step. It’s like telling your application “okay, I’m going to need to store a number that might change.”
The next thing we need to do is give those variables a starting value. We know that the endgame here is to have these variables change over time. But before we can change them, we need to give them an initial value. In other words, before our circle starts moving, where will it appear?
In a previous section, we learned that the setup() function gets called once when the application launches, and then never called again. This sounds like it could be useful for giving our variables some initial values. So in your setup() function, add the following lines.
Perfect! So, to recap, we now have 2 variables, ‘myCircleX’, and ‘myCircleY’, and we have just “initialized” them, or populated with an “initial” value. Notice that, just like any mathmatical equation, we use the equals sign (=) to assign the number 300 to ‘myCircleX’. In c++ parlance, the equals sign is known as the “assignment operator”, because it’s used to assign a value to a variable. The “assignment” always flows from right to left; that is, the value that is being assigned is on the right and thing that is receiving the assignment is on the left.
Notice that we are still passing 3 arguments to the ofCircle function. But now, instead of the old “hard-coded” (200, 300) values that we can’t change, we are letting the variables that we made stand in.
If you run your app now, you shouldn’t notice any change. That’s because we haven’t gotten around to changing the variables yet. So let’s do it.
Let’s edit our draw function a little so that it looks like this:
In this new line, we are using the “assignment operator” again, just like in the setup function. In English, that line would say “take the value of myCircleX plus one, and assign that to myCircleX”. In other words, we are incrementing myCircleX by 1. c++ provides a shortcut for the common task of incrementing a variable: myCircleX++; This is extremely common, so let’s actually change our code to use this handy shortcut:
myCircleX = myCircleX + 1; becomes myCircleX++;
If you run your program now, you should see your circle move off the screen to the right! Animation!
There is just one thing we need to fix before moving on to more pressing aesthetic concerns. If you read back through the descriptions of what the update() and draw() functions are supposed to be used for, you’ll notice that the draw function is for drawing (so far, so good), but the update() function is where we are supposed to take care of updating variables. There are some very good reasons for this that we will get into later, but for now, let’s move the line we just wrote to the update function. So, your update and draw functions should look like this:
You shouldn’t notice any difference in terms of functionality, but it’s a good habit to get into.
Framerate
One thing you may notice about your awesome moving circle is that it starts off kind of slow and then speeds away. This is actually caused by the framerate of your application, which is slow at first while the application fires up, but then gets super fast. As mentioned before, framerate refers to the rate at which the draw/update loop executes. Add this little line of code to the bottom of your draw() function to be able to see your framerate in the upper left corner of your window:
Most likely, it says something very close to 1000fps. That means that your circle is being drawn close to one thousand times per second. If you were to fire up tons of other applications on your computer and start rendering a huge video in FinalCut, you’d notice this framerate drop. The fact is that your application is simply trying to run as fast as it possibly can.
In the interest of having a smoother, more predictable kind of animation, we will lower the framerate to something more reasonable, like 60. In order to do this, we will put a new line into our setup() function.
Add that and then run your program. You will notice that the circle moves considerably slower. Using this function is not a guarantee of 60 frames per second, but it is a guarantee that your framerate will be any higher than that. And unless you have a really old computer, or your processor is already extremely taxed by some other program, it should have no problem running consistently at 60fps while doing something a simple as drawing a moving circle.
TIP: SAT word problem #1: If we know that the update loop is happening (at most) 60 times/second, and we are incrementing the x coordinate of the circle by 1 pixel every time update is called, how long will it take for the circle to move 240px?
Too bloody slow
It’s true that we now have a good handle on the framerate, but 60px/second turns out to be really slow. To fix this problem, we could increase the framerate, but 60fps is a pretty good framerate. so instead, let’s change the speed of the circle itself: instead of just incrementing the x coordinate by 1 pixel every time, let’s increment it by 4. Using the same “incrementing” shortcut, we can change our update() function like this:
voidtestApp::update(){myCircleX+=4;}
The Pacman Effect
Let’s have one final adventure with our purple circle before saying goodbye. Our application is still a litlte dissapointing because once our circle leaves the screen on the right, it’s gone forever. Let’s fix that problem by making the circle re-appear on the left side after leaving on the right: the Pacman Effect.
Before we write any code, let’s think about what this is going to mean in terms of the variables that we have. In the current state, we have myCircleX acting as the x coordinate for our circle, and it is being incrementing by 1 (or 4, if you followed the tip above) every frame. By default, an openFrameworks window is 1024x768. So, one way we could achieve the Pacman Effect is to reset myCircleX back to 300 once it goes beyond 1024.
How can we do this? We know that we are supposed to do any variable updating in the update() function, so let’s start there. We also know that we only want to reset myCircleX if it has gone above 1024. So for that, we use the ‘if’ statement.
only if that test turns out to be true, set myCircleX back to 300;
Adding Interaction
Now that you are a master of animation, it’s time to get the user involved. For this section, we will be focusing on keyboard and mouse interaction.
So far, we’ve been focusing on 3 functions: setup(), update(), and draw(). For interaction, we will start with 2 of the other functions in your testApp.cpp file:
Going back to the producer metaphor can help us understand how these functions work. openFrameworks has done the hard work of setting up your app to know when the user has done some keyboard business. Now, all you have to do is put code into these functions that you want to execute when a particular event occurs:
user physically presses down on a key
user physically releases the key
This might be a little unintuitive if you are accustomed to thinking about typing a letter as a single action: “I just typed the letter ‘o’”. But in fact, they are 2 distinct actions, or “events”, and eventually you might find it handy to be able to distinguish between them.
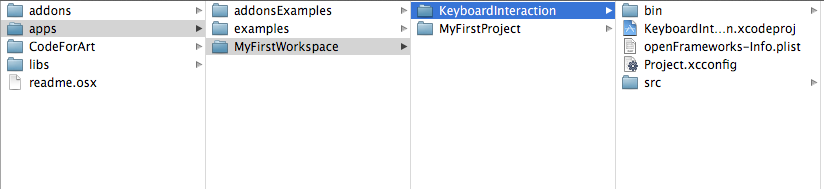
Create a new project in “MyFirstWorkspace” called “KeyboardInteraction”. If you need to, go back to “Creating your First Project” to see how.
Introducing, cout!
The easiest way to quickly see how these functions work is to print a message to the console. Remember when we printed “Hello, World!” to the console in the introduction? We did that using a c++ thing called http://www.cplusplus.com/reference/iostream/cout/[“cout”] (pronounced ‘c out’). The syntax for using it is a bit weird because it’s not technically a function (it’s actually an object, which we will talk more about in later chapters), but if you can get beyond the syntax, it’s actually very useful for debugging.
But first: you may be asking yourself: how will we see text output? We are dealing with a GUI interface now. Luckily, XCode provdes a window where we can see anything text that your program outputs (also known as stdout).
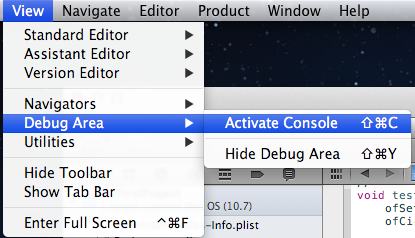
So start by going to View->Debug Area->Activate Console, or press apple+shift+C
NOTE: For XCode 3 users, use the key command Shift-Cmd-R. There’s also a preference in XCode to bring up the console after each launch - Xcode->Preferences->Debugging->On Start Show Console.
You should see a panel like this appear at the bottom of your XCode window
Excellent! Your output will appear in the pane on the right. Now we will add some code to our key functions that will print stuff to the console:
As I mentioned before, the syntax for cout is a little strange and, frankly, way beyond the scope of this chapter. In c++ parlance, cout represents the “standard output stream”, and without worrying too much about what that means, “stream” is a nice way to think about it. If you look at the line of code within ‘keyPressed’, it appears that there is a “stream” of data flowing into the “cout”. First we send in the string “keyPressed “ down the stream, then we send in a variable: key. Finally, we send endl down the stream. endl simply tells the console to go to the next line.
The ‘key’ variable represents the key that was pressed or released. More about this in a bit.
Let’s give it a try. Launch your program and type some keys. I will type “qwerty”. You should see something like this in the console:
GNU gdb 6.3.50-20050815 (Apple version gdb-1708)(Thu Nov 3 21:59:02 UTC 2011)
Copyright 2004 Free Software Foundation, Inc.
GDB is free software, covered by the GNU General Public License, and you are
welcome to change it and/or distribute copies of it under certain conditions.
Type "show copying" to see the conditions.
There is absolutely no warranty for GDB. Type "show warranty"for details.
This GDB was configured as "x86_64-apple-darwin".tty /dev/ttys002
[Switching to process 92317 thread 0x0]
keyPressed 113
keyReleased 113
keyPressed 119
keyReleased 119
keyPressed 101
keyReleased 101
keyPressed 114
keyReleased 114
keyPressed 116
keyReleased 116
keyPressed 121
keyReleased 121
Don’t worry about the crap at the beginning – that’s added by the debugger.
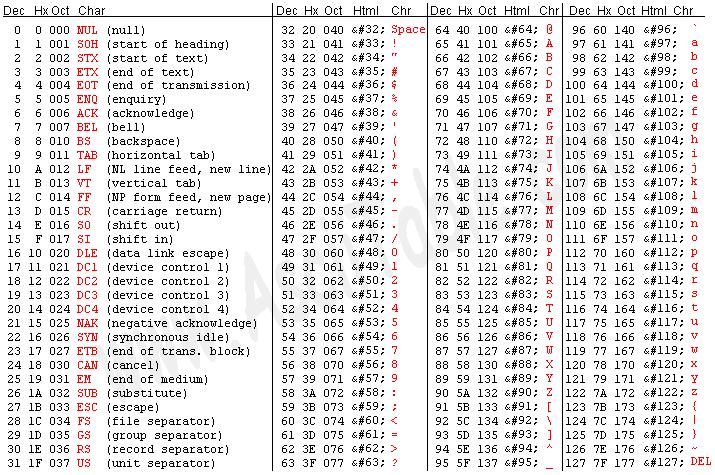
The fact that the ‘key’ is supplied as an ‘int’ may seem a bit strange. Perhaps you were expecting a string or a char? In fact, what this number represents is the ASCII code for the key pressed. Check out this table:
On the right of each column in red, you will see a key on your keyboard. Under the corresponding “Dec” (decimal=base 10) column, you will see the number that you will receive in the key functions.
Tip
You can actually use something called type casting to turn the int into a ‘char’, or letter. Simply put “(char)” before the “key” variable so that your cout statement looks like this:
cout << "keyPressed " << (char)key << endl;
More about type casting later in this chapter!
Fantastic. But presumably we want to do more with the key presses than print to the console. Let’s use the keys to move a ball around on the screen.
Start by adding two variables to your testApp and using them to draw a circle, just like we did in the Adding Movement section:
In the Adding Movement section, we used variables so that we could have the circle move by itself. The difference this time is that we want the ball to move in response to our keyboard input. This means that we need to modify the values of the variables depending on which keys are pressed rather than incrementing it automatically every frame. So it follows that we need to change the value of myCircleX and myCircleY in mousePressed() (or mouseReleased() – it’s up to you!) instead of update().
Let’s use a typical computer game keyboard scheme: say we want the ball to move up when we press ‘w’, to the left when we press ‘a’, down when we press ‘s’, and right when we press ‘d’. We could start by looking up the ASCII values and finding that the values are 119, 97, 115, and 100, respectively. Next, we think about what “up”, “down”, “left” and “right” mean in terms of our variables: myCircleX and myCircleY. What we end up with is:
As we discovered, any time any key is pressed, the keyPressed() function is called. However, we want to be more selective than that. We want to be able to make certain things happen when the ‘w’ key is pressed, and other things happen when the ‘a’ key is pressed, etc. So, we need to add some if statements. When the keyPressed function is called, the first thing that happens is we test if ‘key’ is equal to 119.
Notice the double equals sign. This signifies that we are performing a comparison rather than an assignment. In other words, we don’t want to assign the value 119 to the variable ‘key’, we want to test whether key is equal to 119. If this turns out to be true, than the code inside the curly brackets immediately following the if() is executed.
Your challenge is to complete the function to respond to the ‘s’ and ‘d’ keys.
There are a few important things to notice about this output. First, you will probably see a ton of “mouseMoved” messages. Indeed, this function is called whenever the mouse is moved so much as a single pixel, so be aware of this when adding code to mouseMoved. Next, notice that you see a “mousePressed” before every “mouseDragged” event, and then a bunch of “mouseDragged” messages, and then “mouseReleased” before it switches back to “mouseMoved”.
Interacting With Graphics
So now we know how to make something happen when the user does any mouse business. But printing to the console is hardly the kind of interaction we want. When it comes to interacting with GUI applications, the mouse is used in a variety of ways: simple clicking, double-clicking, dragging, hovering, gestures, etc. One very basic interaction is “user clicks on something, something happens.” Let’s see how we might accomplish this.
Suppose, for instance, that we wanted our trusty circle to expand whenever the user clicks on it. Let’s start by setting up a new project called MouseInteraction2. It will start out very similar to our ‘MouseInteraction’ project:
As you can see, we have added a new variable called ‘myCircleRadius’. It should be clear that, if we want the circle to grow, all we have to do is increase myCircleRadius. The trick will be to determine when this should happen.
It’s clear that it has something to do with the mousePressed function that we just discovered above. We know that mousePressed is called every time the user clicks the mouse, so if we simply drop ‘myCircleRadius++;’ into the mousePressed function, we would be half way there. Try this out.
You should find that the circle grows every time you click the mouse, regardless of whether or not your clicked inside the circle. But our challenge is to only grow the circle when the use clicks inside of it. So how might we go about this?
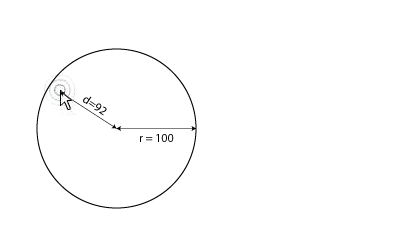
Well, luckily we are dealing with a circle, which will make it significantly easier. Because if we can determine the distance between the center of the circle and the location of the mouse click, we can compare this distance to the radius, and if it is less than the radius, then the click was inside the circle. Take a look at the diagrams:
We know that the radius of the circle = 300, and we know that the mouse click is 230 pixels away from the center of the circle. So, was the mouse click inside the circle?
In this case, we know that the mouse click was 90 pixels from the center of the circle, so the click was clearly inside the circle.
So how do we measure this distance? openFrameworks provides a function called
ofDist(x1, y1, x2, y2) that will save us from doing any basic trigonometry. All we have to do is give it our two coordinates.
The ‘cout’ will allow us to check what kind of values we are getting from ofDist. Run your program now. Click around the screen and see what kind of values get printed in your console.
So the only thing left to do is compare ‘myCircleRadius’ to ‘distance’, and we can do this using a simple if statement.
This code says “first calculate the distance btween the center of the circle and the mouse click. Then compare ‘distance’ to ‘myCircleRadius’. If (and only if) distance is LESS THAN myCircleRadius, increment myCircleRadius by 1.”