Loops and Arrays
In the previous tutorial, we looked at one of the most basic control structures: the if statement. Control structures like the if statement allow you to alter the flow of your program based on criteria that you define. Control structures are not an openFrameworks “thing”, but rather a feature of the c++ language. Let’s take a moment to review a few basics of the c++ language.
Variables
In the previous tutorial, we introduced the idea of using variables to represent values that change over the course of your program. We used 2 integers, or ints - ‘int myCircleX’ and ‘int myCircleY’ - to represent the location of a circle. When you declare a variable as an ‘int’, you are telling the computer “I only intend to put whole numbers into this variable.” This made sense in our example because we were moving a circle by a single pixel, so we didn’t need to worry about fractions.
But there will be times when you do need to have a variable that can hold a fraction, or something completely different, such as letters, words, even a location in memory. There are variable types for each of these situations. Here is a short list of some of them from cplusplus.com
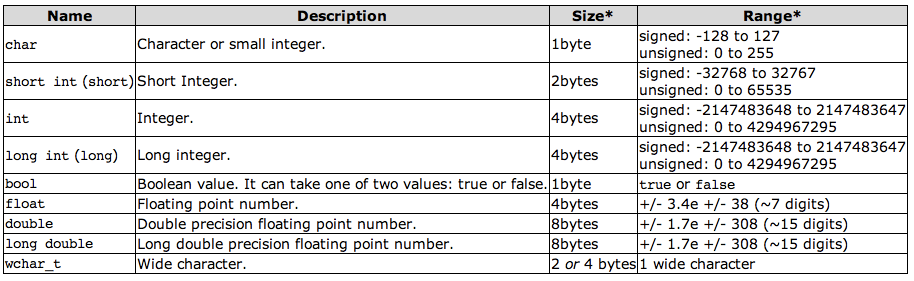
So, as you can see, our basic integer takes up 4 bytes in memory. This is a finite amount of memory, and therefore there is limited (but pretty huge!) range of values that it can hold: namely, -2,147,483,648 to 2,147,483,647. If you need to store higher (or lower) numbers, you’d have to use a ‘long int’, which (contrary to the diagram) can go up to 9,223,372,036,854,775,807 and down to -9,223,372,036,854,775,808.
It may be unintuitive to make such distinctions when dealing with variables. A number is a number, right? Why differentiate between a decimal number and a whole number? The reason has to do with how values are stored in your computer’s memory. Ultimately, by giving the programmer the responsibility of declaring what range and precision their variables need, the program can run that much more efficiently.
Compile and run this program to see information about how your computer treats different kinds of variables.
#include <iostream>
#include <limits.h>
#include <float.h>
using namespace std;

int main ()
{
	cout << "type \t\tsize \tmin \t\t\tmax" << endl;
	cout << "---------------------------------------------------------------" << endl;
	cout << "bool\t\t" << sizeof(bool) << endl;
	cout << "char\t\t" << sizeof(char) << "\t" << CHAR_MIN << "\t\t\t" << CHAR_MAX << endl;
	cout << "unsigned char\t" << sizeof(unsigned char) << "\t\t\t\t" << UCHAR_MAX << endl;
	cout << "short\t\t" << sizeof(short) << "\t" << INT_MIN << "\t\t" << INT_MAX << endl;
	cout << "int\t\t" << sizeof(int) << "\t" << INT_MIN << "\t\t" << INT_MAX << endl;
	cout << "unsigned int\t" << sizeof(unsigned int) << "\t\t\t\t" << UINT_MAX << endl;
	cout << "float\t\t" << sizeof(float) << "\t" << FLT_MIN << "\t\t" << FLT_MAX << endl;
	cout << "long\t\t" << sizeof(long) << "\t" << LONG_MIN << "\t" << LONG_MAX << endl;
	cout << "double\t\t" << sizeof(double) << "\t" << DBL_MIN << "\t\t" << DBL_MAX << endl;
	return 0;
}
There is one important kind of variable that is not covered in this chart: ‘string’. A string can hold a sequence of characters. … more to come …
Loops
Loops are perhaps one of the most important things to be comfortable with as a programmer. They are, arguably, the main advantage of using a computer: doing something over and over again very rapidly is the definition of what a computer is good at. There are a few different kinds of loops, and it is important to be familiar with all of them.
Suppose you want to a circle every 20 pixels across your window. One option would be to copy and paste ofCircle commands like this:
void testApp::draw(){
    ofCircle(20, 300, 10);
    ofCircle(40, 300, 10);
    ofCircle(60, 300, 10);
    ofCircle(80, 300, 10);
    ofCircle(100, 300, 10);
    ofCircle(120, 300, 10);
    // repeat
    ofCircle(1020, 300, 10);
}
That would be over 50 lines of code - ugh. And what if you decided you wanted them every 30 pixels instead of every 20 pixels? You’d have to go back and edit each line of code. And what if the size of your window changed? This is clearly unacceptable. Consider this code:
void testApp::draw(){
	int x = 10;

	ofCircle(x, 300, 10);
	x += 20;
	ofCircle(x, 300, 10);
	x += 20;
	ofCircle(x, 300, 10);
	x += 20;
	ofCircle(x, 300, 10);
	x += 20;
	// copy and paste 47 more times
}
In some ways, this is even worse. We’ve turned one line of code per circle into 2 lines of code per circle. However, there is one very important difference: in this case, the 2 lines are identical every time. We have “abstracted” the task – that is, we have taken out the specifics and made it into a more general form.
So now, all that’s left to do is to tell the computer to do those 2 lines of code a bunch of times instead of us pasting it in ourselves. This is where loops come in.
do…while loop
All loops basically take the same form:
. Set up some initial values (initialization) . Execute the body of the loop . Decide whether to go back to step 2 or exit the loop
The simplest loop is the do/while loop. As the name suggests, this loop allows you to ask the computer to “do” something “while” a condition is met. Using a do/while loop, we can easily draw 51 circles
void testApp::draw(){
    int i = 0;
    int x = 20;
    do {
        ofCircle(x, 300, 10);
        x+=20;
        i++;
    } while( i < 51 );
}
So what just happened? Let’s go through the code step by step as if we were the computer. I apologize that this is the most tedious thing you will ever read, but hopefully it will illustrate what is going on in the loop.
. Initialize a variable called i and set it equal to 0
. Initialize a variable called x and set it equal to 20
. Draw a circle at (20, 30) with a radius of 10
. Increment x by 20 (it now equals 40)
. Increment i by 1 (it now equals 1)
. Is 1 less than 51?
.. Yes! Go back to the beginning of the loop
. Draw a circle at (40, 30) with a radius of 10
. Increment x by 20 (it now equals 60)
. Increment i by 1 (it now equals 2)
. Is 2 less than 51?
.. Yes! Go back to the beginning of the loop
. Draw a circle at (60, 30) with a radius of 10
. Increment x by 20 (it now equals 80)
. Increment i by 1 (it now equals 3)
. Is 3 less than 51?
.. Yes! Go back to the beginning of the loop
. REPEAT 46 TIMES UNTIL i=50 and x=1000
. Draw a circle at (1000, 30) with a radius of 10
. Increment x by 20 (it now equals 1020)
. Increment i by 1 (it now equals 51)
. Is 51 less than 51?
.. NO! Exit out of loop and continue on to whatever comes next
TIP
We could actually make this even a bit more efficient and make the ‘x’ variable to double duty like this:
int x = 20;
do {
	ofCircle(x, 300, 10);
	x+=20;
} while(x < ofGetWidth());
This has the added advantage of being immune to changes in window size. Try making the window bigger and smaller – the circles will always be drawn to the end of the window.
while loop
In a while loop, the ‘while’ part is simply moved up to the top of the loop. So if we want to draw a string of circles with a while loop, it would look like this:
int i = 0;
int x = 20;
while(i < 51)
{
	ofCircle(x, 300, 10);
	x+=20;
	i++;
}
The only difference between a do…while loop and a while loop is that the the condition happens first, before the loop body runs. For example, suppose we edited our do…while loop like this:
int x = 10;
do {
	ofCircle(x, 300, 10);
	x += 20;
} while( x < mouseX );
Notice how we’ve changed the condition so that the circles will be drawn until ‘x’ is less than the x position of the mouse. Run this code and see what happens. Notice, in particular, that there is always 1 circle on the screen regardless of how far to the left the mouse goes. Now transform that into a while loop:
int x = 10;
while( x < mouseX )
{
	ofCircle(x, 300, 10);
	x += 20;
}
Now, if you move your mouse beyond the left side of the window, nothing at all is drawn. This is because before the body of the loop is executed (namely the ofCircle draw command), the test is done. So if mouseX is less than x, no circles are drawn at all.
for loop
We’ve saved the best for last. The for loop is probably the one that you will use the most. This might be because it combines all 3 parts of a loop (initialization, condition, and incrementing) into one compact syntax. Let’s draw the same circles using a for loop:
int x = 20;
for(int i=0; i<51; i++)
{
	ofCircle(x, 300, 10);
	x+=20;
}
The syntax of the for loop can be a little daunting at first, but let’s take it apart piece by piece. The first part is initialization: “int i=0;” Pretty straightforward: we now have an integer called i that we have set to 0. The next part is the condition: “i<51”. In other words, we want the loop to continue so long as i is less than 51. And lastly, the increment: “i++”. After every iteration of the loop, we will increment i by 1.
We saw each of these things in the other kind of loops. THe only difference here is that they are all smushed into one line.
Arrays
Another strength of computers is that they are encyclopedic: that is, they can keep track of a huge number of things at a time. Suppose we want to draw six thousand moving particles? We know from the loop section that it is trivial to do something over and over again, but so far, we have only used loops to achieve a relatively consistent pattern. If we want do draw tons of particles, each with their own position, things get a little more complicated.
float circle1x;
float circle1y;
float circle1r;
float circle2x;
float circle2y;
float circle2r;
float circle3x;
float circle3y;
float circle3r;

void testApp::setup(){
    ofSetFrameRate(24);

    circle1x = ofRandom(0, ofGetWidth());
    circle1y = ofRandom(0, ofGetHeight());
    circle1r = ofRandom(10, 40);

    circle2x = ofRandom(0, ofGetWidth());
    circle2y = ofRandom(0, ofGetHeight());
    circle2r = ofRandom(10, 40);

    circle3x = ofRandom(0, ofGetWidth());
    circle3y = ofRandom(0, ofGetHeight());
    circle3r = ofRandom(10, 40);

}

void testApp::update(){
    circle1x += ofRandom(-1,1);
    circle1y += ofRandom(-1,1);

    circle2x += ofRandom(-1,1);
    circle2y += ofRandom(-1,1);

    circle3x += ofRandom(-1,1);
    circle3y += ofRandom(-1,1);
}

void testApp::draw(){
    ofCircle(circle1x, circle1y, circle1r);

    ofCircle(circle2x, circle2y, circle2r);

    ofCircle(circle3x, circle3y, circle3r);
}
TIP: Notice the use of ofRandom(). This function will return a random number. It takes 2 arguments: the minimum possible value and the maximum possible value. What I am saying in this code is “give me a number between 0 and the width of the screen.”
Technically this works, but we have only drawn 3 circles, and already the code is getting unwieldy. We want to draw 1000! We clearly have a bunch of variables that are used in very similar ways. Why not group, say, all of the x coordinates into a single set, and all of the y coordinates, etc.?
These sets are called arrays. Check out the following code:
float circleX[3];
float circleY[3];
float circleRad[3];

void testApp::setup(){
    ofSetFrameRate(24);

    circleX[0] = ofRandom(0, ofGetWidth());
    circleY[0] = ofRandom(0, ofGetHeight());
    circleRad[0] = ofRandom(10, 40);

    circleX[1] = ofRandom(0, ofGetWidth());
    circleY[1] = ofRandom(0, ofGetHeight());
    circleRad[1] = ofRandom(10, 40);

    circleX[2] = ofRandom(0, ofGetWidth());
    circleY[2] = ofRandom(0, ofGetHeight());
    circleRad[2] = ofRandom(10, 40);
}

void testApp::update(){

    circleX[0] += ofRandom(-1,1);
    circleY[0] += ofRandom(-1,1);

    circleX[1] += ofRandom(-1,1);
    circleY[1] += ofRandom(-1,1);

    circleX[2] += ofRandom(-1,1);
    circleY[2] += ofRandom(-1,1);
}

void testApp::draw(){

    ofCircle(circleX[0], circleY[0], circleRad[0]);
    ofCircle(circleX[1], circleY[1], circleRad[1]);
    ofCircle(circleX[2], circleY[2], circleRad[2]);
}
As you can see, we’ve replaced int circle1x, int circle2x, and int circle3x with simply int circleX[3]. Now circleX is an “array” that can hold up to 3 integers, rather than just 1. Read a little further, and you will see that, in order to assign a value to one of the ints in the array, you use the square brackets, like this: circleX[0] = 50;
Down in the draw function, you can see that we use the same syntax to use the values that we have previously assigned to a particular slot in the array.
But this is still kind of a mess. One sign that you might not be utilizing loops as much as possible is if you see patterns in your code – that is, similar sequences of code over and over again. So let’s try to clean this up even more using some ‘for’ loops.
float circleX[3];
float circleY[3];
float circleRad[3];

void testApp::setup(){
    ofSetFrameRate(24);

    for(int i=0; i<3; i++)
    {
        circleX[i] = ofRandom(0, ofGetWidth());
        circleY[i] = ofRandom(0, ofGetHeight());
        circleRad[i] = ofRandom(10, 40);
    }
}

void testApp::update(){

    for(int i=0; i<3; i++)
    {
        circleX[i] += ofRandom(-1,1);
        circleY[i] += ofRandom(-1,1);
    }
}

void testApp::draw(){

    for(int i=0; i<3; i++)
    {
        ofCircle(circleX[i], circleY[i], circleRad[i]);
    }
}
Now, instead of putting hard-coded numbers between the square brackets, we use the ‘i’ variable of our for loop.
#define
A wise person once said: the primary virtue of a programer is laziness. Suppose you wanted to change the number of circles that appear on the screen from 3 to 500. Obviously, the first step would be to change circleX[3] to circleX[500], and likewise circleY and circleRad. Oh, but that’s not all. You’d still have to go through every “for” loop and change i<3 to i<50. That’s a lot of work!
It would be great if we could use a variable to keep track of how many items we have in our array! It might look something like this:
int num = 500;
float circleX[num];
float circleY[num];
float circleRad[num];
Unfortunately, this isn’t possible. You can’t use a variable to declare a variable.
Instead, we will use a new thing called a #define (pronounced: “pound define”). Take a look at this:
#define NUM_CIRCLES 500

float circleX[NUM_CIRCLES];
float circleY[NUM_CIRCLES];
float circleRad[NUM_CIRCLES];
int circleR[NUM_CIRCLES];
int circleG[NUM_CIRCLES];
int circleB[NUM_CIRCLES];

void testApp::setup(){
    ofSetFrameRate(24);

    for(int i=0; i<NUM_CIRCLES; i++)
    {
        circleX[i] = ofRandom(0, ofGetWidth());
        circleY[i] = ofRandom(0, ofGetHeight());
        circleRad[i] = ofRandom(10, 40);

        circleR[i] = ofRandom(0, 255);
        circleG[i] = ofRandom(0, 255);
        circleB[i] = ofRandom(0, 255);
    }
}

void testApp::update(){

    for(int i=0; i<NUM_CIRCLES; i++)
    {
        circleX[i] += ofRandom(-1,1);
        circleY[i] += ofRandom(-1,1);
    }
}

void testApp::draw(){

    for(int i=0; i<NUM_CIRCLES; i++)
    {
        ofSetColor(circleR[i], circleG[i], circleB[i]);
        ofCircle(circleX[i], circleY[i], circleRad[i]);
    }
}
At the very top, notice the line “#define NUM_CIRCLES 500”. This isn’t technically a line of c++ code, but rather a message to your compiler. It tells the compiler “before you start compiling code, anywhere you see NUM_CIRCLES, replace it with 500”. That’s it! A #define is one of a couple messages that you can send to the compiler (or, more accurately, the preprocessor), known more broadly as preprocessor directives. We will talk more about them at a later date., but for now, all you need to know is that #define is a very simple find/replace procedure.